How to Set Up ChatGPT-4 Service Using GitHub Copilot
GitHub Copilot is a AI assistant developed by GitHub to help developers write code. It is a Visual Studio Code plugin based on OpenAI…
GitHub Copilot is a AI assistant developed by GitHub to help developers write code. It is a Visual Studio Code plugin based on OpenAI Codex, providing features such as code suggestions, auto-completion, auto-fixing, and auto-refactoring. Currently, GitHub Copilot also supports chat functionality, powered by GPT-4. However, it is only available within the context of VS Code. In this article, I will explain how to set up a chat service using GitHub Copilot, allowing you to use it anywhere.
Open-Source Components
- ChatGPT-Next-Web: A well-designed, cross-platform ChatGPT web UI with support for GPT3, GPT4, and Gemini Pro.
- copilot-gpt4-service
- An AWS EC2 server is needed to run the copilot-gpt4-service, but you can choose any cloud service provider you prefer or run it locally.
- Vercel: A free static website hosting service to deploy the ChatGPT-Next-Web service.
- Cloudflare: A free CDN service used for domain name resolution.
Obtaining the GitHub Copilot Token
Please refer to this document, GitHub Copilot Token. On a Mac, you can use the following command to obtain the token:
bash -c "$(curl -fsSL https://raw.githubusercontent.com/aaamoon/copilot-gpt4-service/master/shells/get_copilot_token.sh)"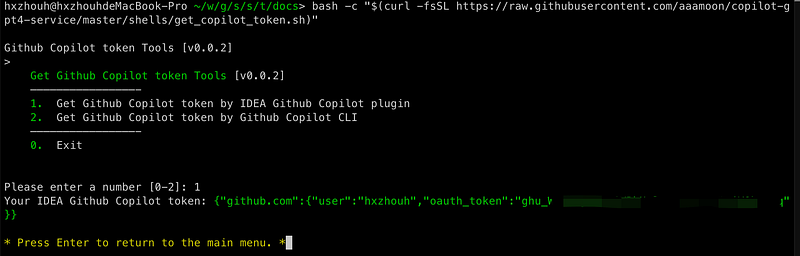
As shown in the screenshot, you need to copy the token to the clipboard for later use.
Running the copilot-gpt4-service
- The copilot-gpt4-service supports Docker deployment, and the official project provides a docker-compose file. You only need to modify the environment variables.

- Add a server block in NGINX:
server {
listen 443 ssl;
listen [::]:443 ssl;
server_name chat.example.com;
ssl_certificate /etc/nginx/cert/public.pem;
ssl_certificate_key /etc/nginx/cert/private.key;
location / {
proxy_pass http://127.0.0.1:8086/; # Replace with the copilot-gpt4-service address
rewrite ^/(.*)$ /$1 break;
proxy_redirect off;
proxy_set_header Host $host;
proxy_set_header X-Forwarded-Proto $scheme;
proxy_set_header X-Real-IP $remote_addr;
proxy_set_header X-Forwarded-For $proxy_add_x_forwarded_for;
proxy_set_header Upgrade-Insecure-Requests 1;
proxy_set_header X-Forwarded-Proto https;
}
}Don't forget to reload the NGINX configuration file.
- Add a domain name resolution for "chat.example.com" on Cloudflare, pointing to the IP address of your NGINX server.
Deploying the ChatGPT-Next-Web Service on Vercel
ChatGPT-Next-Web supports one-click deployment to Vercel. You don't need to make any changes.
Once the deployment on Vercel is complete, you can add a custom domain name, such as "chatnext.example.com".
Testing
Open your browser and enter "chatnext.example.com". Click on the settings button in the bottom left corner and select "Custom Interface". Enter "https://chat.example.com" as the API endpoint, and use the GitHub Copilot token copied in the first step as the API token. Click on "Save", and you can start chatting.
Note: I don't know if this approach complies with the usage agreement of GitHub Copilot. I am doing this for my own convenience and will not share it with others. If you deploy your own service, please refrain from sharing it with others.
If you found this article helpful, please consider following and applauding me. Your support is greatly appreciated. Thank you!